> ## Documentation Index
> Fetch the complete documentation index at: https://suibyexamples.com/llms.txt
> Use this file to discover all available pages before exploring further.
# Let's Deploy a Walrus Site
> Step-by-step guide to deploying websites on Walrus decentralized storage
Crypto’s centralized facets have most of their frontends on Web2 servers and services, and that's a pretty big deal. What if the entire stack could be decentralized?
That’s the problem Walrus solves. Now you can deploy any static website to Walrus and harness all the benefits of decentralization. This article will teach you how to deploy a Walrus site.
## Installing Walrus Site Builder
First, you’ll need to get set up with Walrus. I recommend installing via the CLI commands, especially if you’re on a Mac, because I ran into an issue trying to install it on my Mac.
You will likely deploy your Walrus site on Mainnet, so execute this command to install the Walrus CLI tool and then the website builder for mainnet.
Execute this command to install the latest Walrus mainnet version:
```bash [terminal] theme={null}
curl -sSf https://docs.wal.app/setup/walrus-install.sh | sh
```
You’ll need to add the `walrus` binary to your PATH. Also, you need to download the latest Walrus cofigurations with this command:
```bash [terminal] theme={null}
curl https://docs.wal.app/setup/client_config.yaml -o ~/.config/walrus/client_config.yaml
```
Now execute this command to install the website builder.
```bash [terminal] theme={null}
SYSTEM= # set this to your system: ubuntu-x86_64, ubuntu-x86_64-generic, macos-x86_64, macos-arm64, windows-x86_64.exe
curl https://storage.googleapis.com/mysten-walrus-binaries/site-builder-mainnet-latest-$SYSTEM -o site-builder
chmod +x site-builder
```
You’ll also need to move the binary to any directory included in your \$PATH environment variable. You can do that with this command:
```bash [terminal] theme={null}
sudo mv site-builder /usr/local/bin/
```
Once you’re set up, you should be able to use `site-builder` as a command in your terminal like this:
```bash [terminal] theme={null}
site-builder
```
If you encounter any issues, visit the [site builder installation page](https://docs.wal.app/walrus-sites/tutorial-install.html) for cues or ask the AI.
## Deploying Your Walrus Site
Regardless of the frontend framework you’re using, you can transpile into static files and build with Walrus.
In this case, I’m going to deploy a Vitepress site, so I’ll need to build it with this command:
```bash [terminal] theme={null}
npm run build
```
Once you have your static files based on whatever frontend framework you’re using now, onto Walrus.
You’ll need to download the latest Walrus configuration file. Execute this command for that:
```bash [terminal] theme={null}
mkdir -p ~/.config/walrus
curl https://raw.githubusercontent.com/MystenLabs/walrus-sites/refs/heads/mainnet/sites-config.yaml -o ~/.config/walrus/sites-config.yaml
```
You should find the file in your working directory. Here’s the path:
```bash [terminal] theme={null}
~/.config/walrus/sites-config.yaml
```
Now `site-builder` will automatically find it — you don't need to pass `--config` manually every time!
Now execute this command to deploy the site
```bash [terminal] theme={null}
site-builder publish ./dist --epochs 1
```
The `./dist` is the folder with static files. `-epochs 1` means the site will live for at least 1 epoch (you can set more if you want)
This should build the site and you’ll get some important data as output
including Blob IDs created for each file, the **new Site Object ID** (important!) and the options you have to share your site.
Congratulations, your site is **live on Walrus!**
## Purchasing and Registering Domain Names
You can [bring your existing domains](https://docs.wal.app/walrus-sites/bring-your-own-domain.html) to Walrus, or you can use the Sui name service to keep the entire system down to naming decentralized.
Simply head over to the [Sui Name Service Website](http://suins.io) and buy a `.sui` domain for your project:
After buying the domain, select one of the domain names you own and enter the site object ID like this:
Once that’s done. Immediately visting the domain (your name).wal.app should
## Conclusion
You’ve learned how you can deploy a Walrus site and keep the domain name service decentralized by connecting it to a SuiNS domain.
Next, learn how you can store your files on Walrus with the official TypeScript SDK.
 Congratulations, your site is **live on Walrus!**
## Purchasing and Registering Domain Names
You can [bring your existing domains](https://docs.wal.app/walrus-sites/bring-your-own-domain.html) to Walrus, or you can use the Sui name service to keep the entire system down to naming decentralized.
Simply head over to the [Sui Name Service Website](http://suins.io) and buy a `.sui` domain for your project:
Congratulations, your site is **live on Walrus!**
## Purchasing and Registering Domain Names
You can [bring your existing domains](https://docs.wal.app/walrus-sites/bring-your-own-domain.html) to Walrus, or you can use the Sui name service to keep the entire system down to naming decentralized.
Simply head over to the [Sui Name Service Website](http://suins.io) and buy a `.sui` domain for your project:
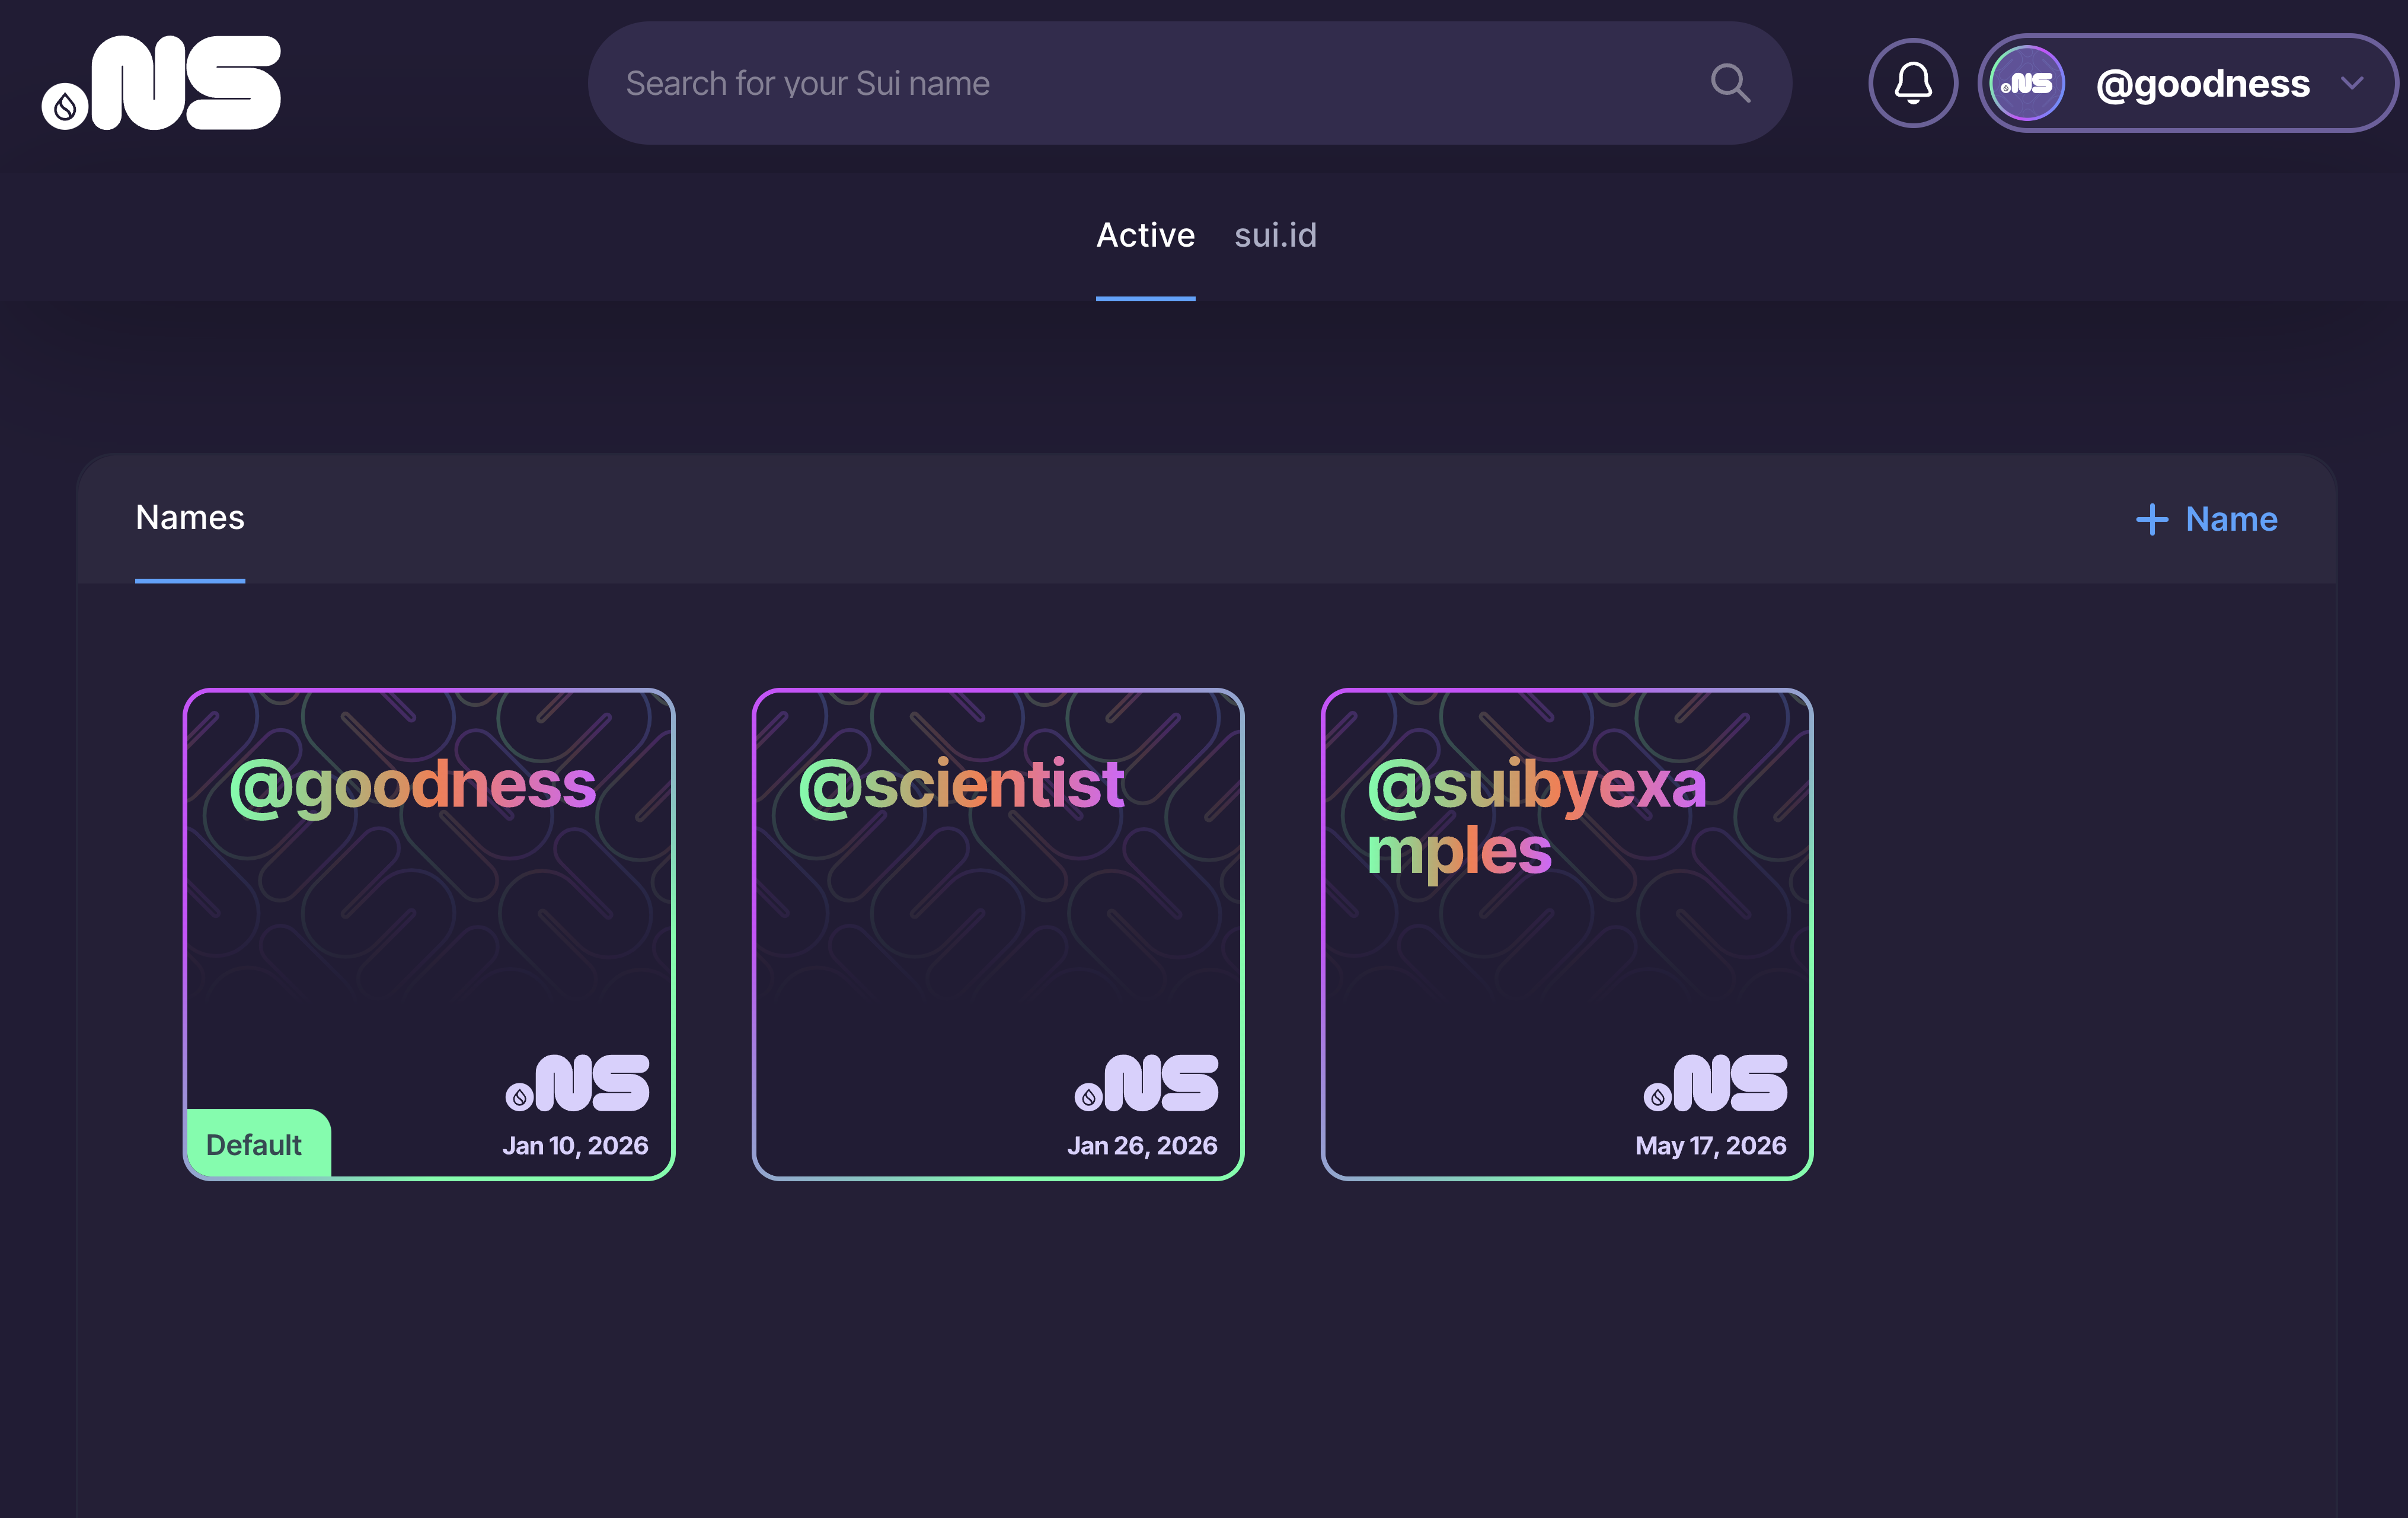 After buying the domain, select one of the domain names you own and enter the site object ID like this:
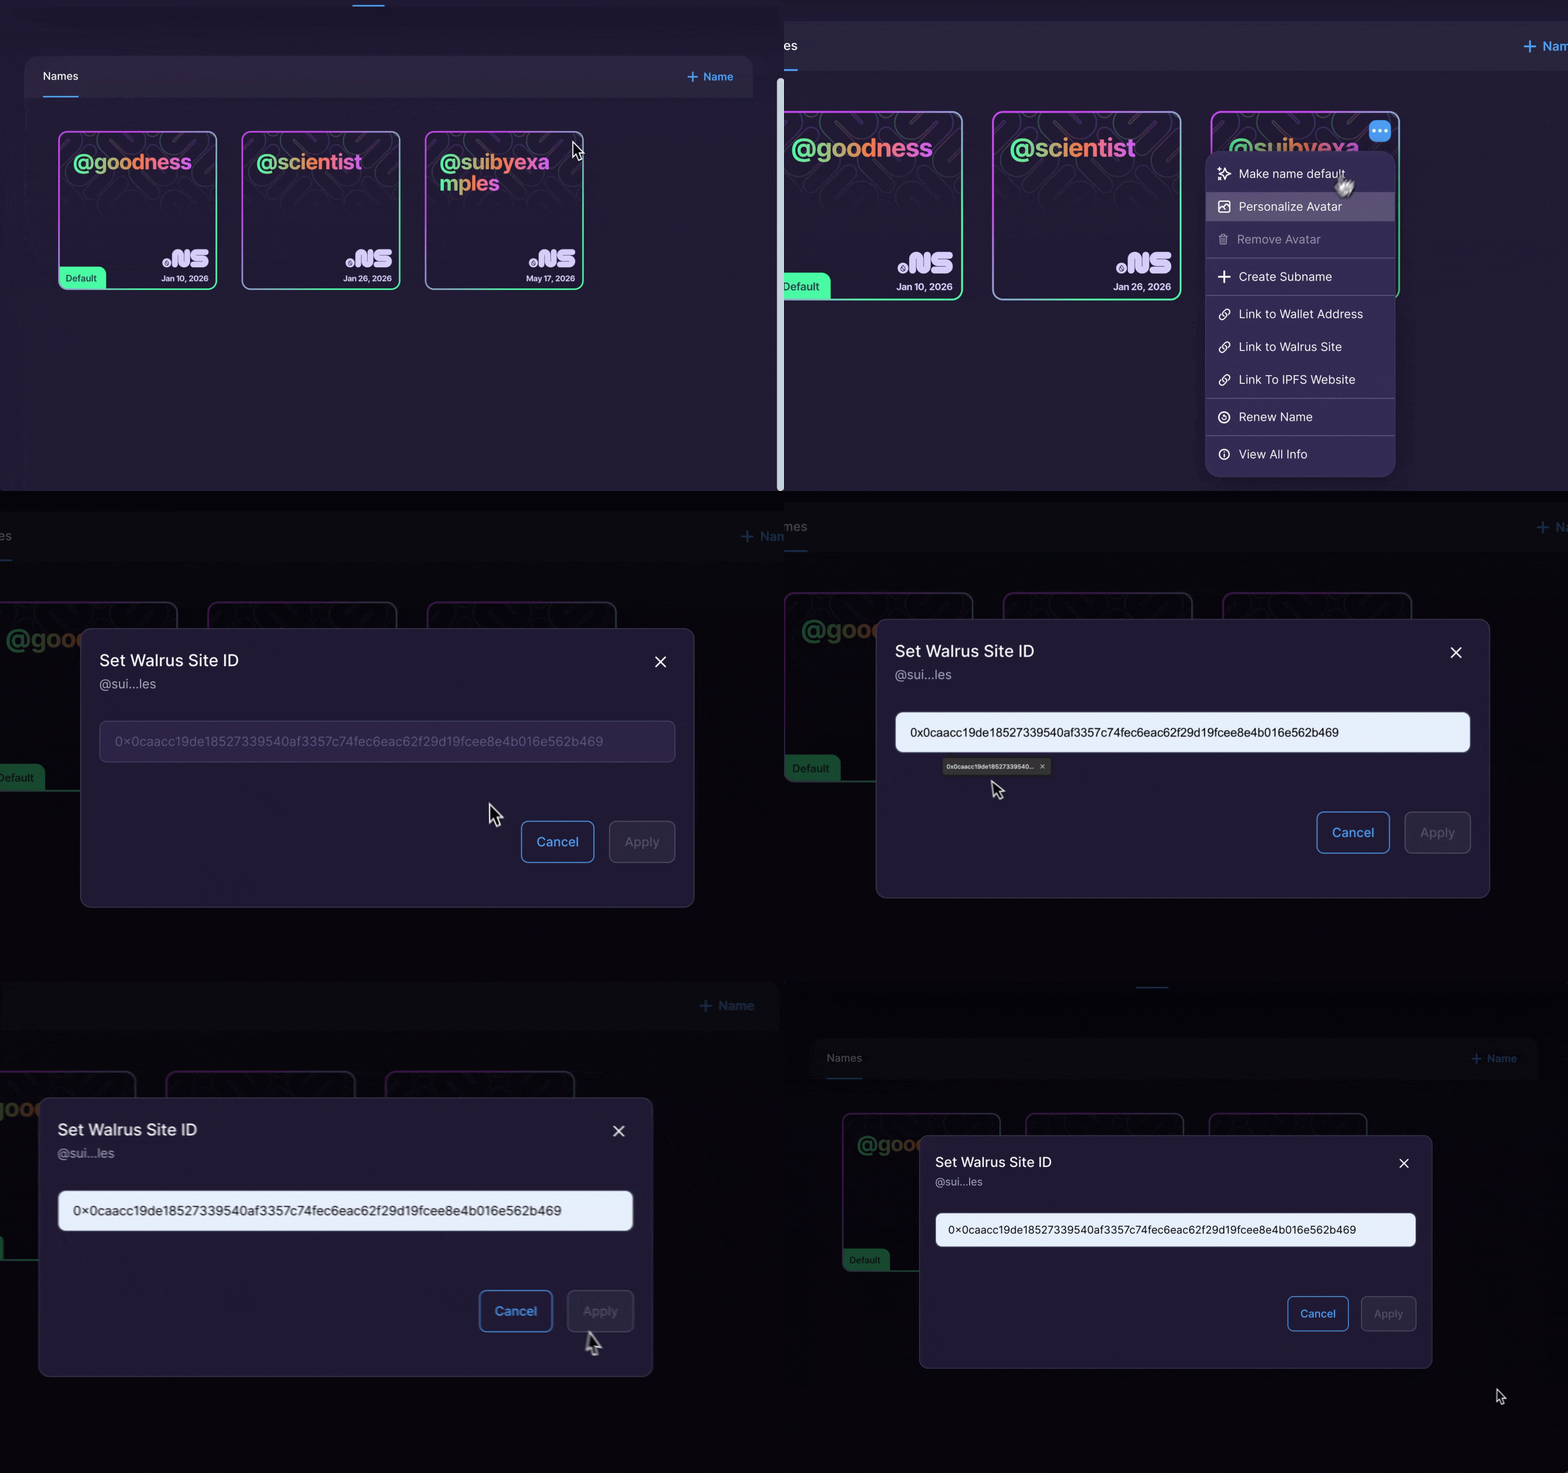 Once that’s done. Immediately visting the domain (your name).wal.app should
## Conclusion
You’ve learned how you can deploy a Walrus site and keep the domain name service decentralized by connecting it to a SuiNS domain.
Next, learn how you can store your files on Walrus with the official TypeScript SDK.
Once that’s done. Immediately visting the domain (your name).wal.app should
## Conclusion
You’ve learned how you can deploy a Walrus site and keep the domain name service decentralized by connecting it to a SuiNS domain.
Next, learn how you can store your files on Walrus with the official TypeScript SDK.